Tuesday, February 23, 2010

Box of Craft Goodies :: Keeping it Organized


I have shown you all how I keep the craft cabinet organized. This craft cabinet is for the items I don't mind my children getting into without my supervision/permission.

But then there are items that are only allowed to come out when I am there and can supervise. These items are out of arms reach. But how do I keep them all together in one easy-to-grab spot? Simple!

Below are photos of how I have organized these items. All in one easy-to-grab case. Perfect for art projects, everything we need is at hand in one location. Also makes clean up a breeze.


Items included are:
  • 2 pks Watercolors (I have two children)
  • 1 pack of oil pastels
  • 1 pack of chalk pastels
  • 1 small watercolor
  • 1 pack of paintbrushes (for mommy)
  • 4 other paint brushes for children
  • watercolor pencils (mostly for me, but my oldest will be using them soon)
  • 6 bottles of tempera paint
  • 2 paint trays
  • 4 paint cups
  • 2 pairs of scissors
  • 2 pencils
  • one paint marker (for me)
  • Pack of watercolor paper
  • Pack of drawing paper
  • Pack of construction paper
  • 6 mat frames for artwork
  • 2 plastic cups for water
  • One bottle of white glue
  • glue sticks


The container I found at T.J Maxx for $3. The little Christmas bucket was a gift from one my husbands co-workers (filled with candy). I figured since it's inside the container, it didn't matter that there were Christmas trees on it.

This works perfectly for us. I don't have to worry about items getting messed up, lost, or ruining my home. I love this little container.

Just seeing it all sitting there, together, makes me want to create. I mean really, just LOOK at those watercolors, so beautiful!


How do you store your art supplies?



What's in a Purse?


Heather, over at Lark and Lola did a fun post today and I thought I would join in on the fun.

Ever wonder what other women carry in their purse? I do! It's like wanting to see inside someones home, it can tell you so much about them. I love seeing how people interpret a space and make it their own. Same goes with a purse. I love to see what matters most to you, that you have to carry it around on a daily basis.

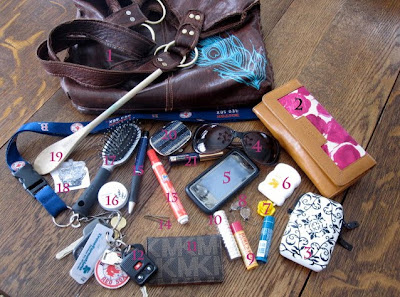
Here are the contents of my purse. Yes, everything that was in my purse before the photo is displayed. My hubby has made the comment a few times that I am the only woman he has ever met with a neat purse, ALL the time. He just happens to catch it after I have cleaned it out. Lucky me. ;)


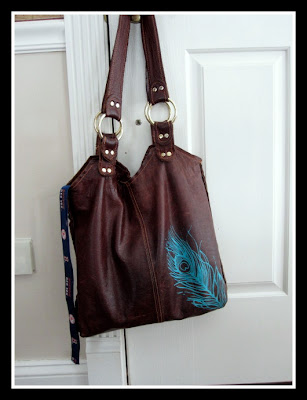
1. My fabulous purse from Etsy. this is the Twilight purse, crafted by the very person who created the one for the movie. Funny thing, I had it saved in my fav's before it made it into the movie, then I saw this purse in the movie and thought, "that's so cute, I want it". then two weeks later I was cleaning out my favs and saw I had the very purse in there from the movie. So I bought it.
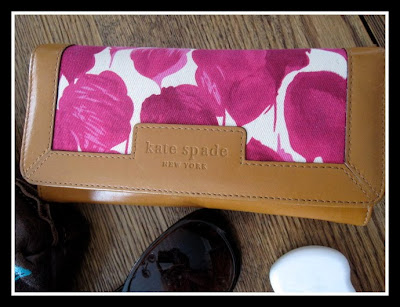
2. My Kate Spade wallet that goes to my matching Kate Spade purse. I haven't found a wallet I like that matches my purse...


3. My damask camera bag for my Canon Powershot SD 780 IS Elph. This was my Christmas present. The hubs picked it out and saw the bag at Target. He thought I would love it, and he was right!
4. My Target clearance Sunglasses. I can't leave the house without these, my eyes are so sensitive.


5. My Chocolate Touch cell. Love this baby!
6. My floss, never leave home without it.
7. My yellow flower cabochon pendant. In case I need to switch necklaces.
8. My vintage swarovski earrings, in case I forget to put some on. These are so universal, they go with anything!


9. My Burt's Bees chapstick (LOVE it!) and my daughters Blistex "lipstick"
10. Clinque "Vintage Wine" lipstick. The best red color ever!
11. My Michael Kors Business card holder (with biz cards inside)


12. My keys. Yes, I am a Sox fan. Can you tell?
13. Tide to go. A must have. My children like to get messy.
14. Mini Bobbi pins for my daughter. She is constantly losing them so I keep steady supply in my purse.
15. My pen. Always have one with me.


16. Avon cuticle cream. This stuff really works.
17. A hair brush, for when we are racing out the door and I have to brush my daughters hair while we are walking into wherever we are going.
18. Two stamped crown images. They must have fallen in my purse, I don't normally keep them there. :)
19. A mini wooden spoon. For discipline. Yes, I take that with me everywhere as well. And my children know it too. :)


20. My beaded pill box. I suffer from migraines and have a near constant headache everyday, so this bad boy is essential!
21. My Estee Lauder mascara. A freebie and the perfect size for my purse. I usually have to apply on the go when we are headed to church. No matter how early I wake up, there just never seems to be enough time.

Now that you know what I carry around everyday, I'd love to see what's in your purse! Check out heathers post too, I want her weekly planner so bad!

I've shared with you, now it's time for you to reveal your contents!


Monday, February 22, 2010

My Easter Cards


I love the winter, I LOVE the snow. But, since we aren't expected to get any more (after our snowmaggeden earlier this month) I am definitely ready for spring. I think I am mostly excited about it's arrival because it's bringing with it a new fresh beginning.

We are moving next weekend and I can't wait. I am so excited. New beginnings and new changes.


When I saw these darling little cards in a local shop I simply could not resist! They were just calling out to me. And at .50 a piece, they made my wallet happy too. They make me very excited for Spring's arrival. But I am in no hurry for Winter to go completely away just yet.


So I am off to write my Easter Greetings.

Are you ready for Spring to make it's appearance?


Thursday, February 18, 2010

Spherical Decor


{Originally posted January 2009}

Spherical (if that's a word) Decor! All the rage.

I have been seeing a lot of these things around in home decor. These suckers are not Cheap! I am! So, I had a brilliant idea. (I am full of those you know). Anyway, I thought, why not make my own? I have all the items to do so.

I quickly pulled out my glue, Styrofoam ball, and moss and got to work.

Gluing in small sections at a time just adhere the moss to the ball. You can tie green thread around the ball to help secure the moss a bit more. I skipped that step mostly because these will be in a jar, but also because I am too lazy to go digging through my chest to find the case of green thread. (yes I have that much thread-18 cases full of thread, color co-ordinated).

These were easy and FAST! I only had two balls on hand so I will be stopping by the dollar store later this weekend. (Yes, I realize how bad that sentence sounds-no pun intended) Be good readers!

Send me your photos or links to your creations! Can't wait to see them! :) OR, if you feel you would not want to make these but can not live without them, I have some in my esty shop. Check it out! :)


Saturday, February 6, 2010

V-Day Project : : Tutorial


Since being snowed in with over 26" of snow the last day and a half (and it's still coming down), I have had some time to play with a few items I had laying around. This entire project was completed this morning and I spent only $ 2.26 (not including tax)

Start by gathering your materials. You will need:

Wood block (Michael's $.54)
Styrofoam heart (Michael's $.59)
Dowel Rod (Walmart $.34)
Bird (A.C. Moore Christmas clearance $.79)
Paint (on hand)
12x12 Patterned paper (on hand)
Mod Podge (or similar item-on hand)
Paint brush (on hand)
Glue (on hand)
Ribbon (on hand)
Metal Key Embellishment (if you choose)

Start painting your block which ever color you chose. I used Heirloom White. Then tear your paper in .5" strips. I did not measure this, I just looked to make sure it was as thin as I wanted it.
Use the mod podge (I have a love-hate relationship with this stuff) or whatever medium you choose, and start gluing the paper pieces to your heart. Like this:

Soon you will have a completely covered paper heart.

Next step is to grab your (or your honeys) drill with a drill bit large enough to fit your dowel rod. Center the hole on your wood block, unless of course, you don't want it centered. Be sure not to drill straight through as it will make it difficult to hold your dowel rod in place.

Once the hole has been drilled drop some glue into it and put the dowel rod in. I used Scotch Quick-Dry adhesive. I am In LOVE with this glue-it's holds anything, even metal!

Once that is complete, take the drill and just push it through the Styrofoam heart to make the hole, no need to drill it in. Again, add some glue and slide the heart onto the dowel rod. Let dry.

You now have a simple heart on a stick, we need to make it a little more festive. Tie some ribbon at the base of the heart and glue your cute little bird to the wood block. (At this point you can choose to add a key, I thought it looked pretty cute with the bird holding it in his beak. Just use hot glue when attaching it).


Once he is glued on there stand back, and enjoy.


You have created a fun little Valentine's Day decor.


Wednesday, February 3, 2010

My Weekly Meal Planner :: Giveaway


The last two days {posts} have been about organizing your recipes and creating an easy, time-saving method in which you can have all of your meals planned for a month or longer.

As I mentioned earlier, I have a great (and super cute) weekly planner that helps me with my grocery shopping.

I flip through my recipe book and find 6-7 recipes I want to make this week. (this process takes me a little while b/c I am also looking at the sale flier for the grocery-thus, helping me to determine which meals to make)


Then I grab my oh-so-stylish weekly planner and fill in which meal to have on each day of the week.


Next, I take a quick look through my pantry and fridge and take stock of what I need to purchase for each meal. In the column to the right, add the items needed from the store to complete each meal.


Viola! Meal planning and list making were never so easy and fun.

Now for the truly fun part: GIVEAWAY time


Do you want your very own recipe book (magnetic) and weekly planner? Yes?! I thought so! (color may not be the same as my recipe book-not sure if I still have that paper)

4 chances to win: Leave me a comment, follow this blog, follow me on twitter, or follow my face book page.

Leave a comment for each one you do. Deadline for this contest is Friday. I will choose a winner Tuesday morning and ship that same day.


Tuesday, February 2, 2010

Filling your recipe book


As previously mentioned, I have a fabulous method for my meal planning. You all have made your super cute recipe books by now right? Ok, good! Now we need to fill them.

Start by thinking of your 5 favorite dishes.


Then think of 2-3 dishes you KNOW your family LOVES.


Next, think of 2-3 super easy, quick meals. Ya know, the ones you make on nights that little Johnny has soccer practice at 4 and little Suzie has ballet at 4:05 and they both have piano lessons at 5:10, and Big Brother has to be picked up from chess club at 5:15. What are your meals for those days?


Got that list made? Good, now go through all of your floating recipe cards and bazillion recipe books, track down those recipes and get the ingredients and prep/cooking instructions.

Once all that is done, add them to your new recipe flip book. {I am giving you one of my favorite recipes to get you started}

Taco Soup

1 lb. ground turkey or beef
1 large can diced tomatoes
1 can chili beans in sauce
1 can black beans (rinse and drain)
1 can Ro-tel (original or spicy, depending on your taste)
1 can white shoepeg corn
1 packet Taco seasoning
1 packet Ranch dressing mix

Cook the beef first and drain, if needed, then dump it all in. You may need to add water to thin it some. Enjoy!


Note in the above picture I did something silly. Please don't copy my mistake. Make sure you write the directions on the back of the card in the same direction as the front. It makes reading your recipe book much easier.

Once you have completed this last and final step, Enjoy! Realize, that you now have a small handy book to reference and it is filled with 11 recipes that are tried and true. You know your family will enjoy them and you now have the next two weeks of meal planning done! DONE!

Continue to add recipes until you have 30. That is a whole month of planned meals. Once you have reached that number, add 20 more, 50 recipes to get you through, such a time saver!

I can't tell you how much I use mine, ok well, yes I can. I use it every week. And I am so thankful for it. It makes my grocery shopping much less painful as well. I currently have 38 recipes in my book, still working on the other 12. I use this, combined with my weekly meal planner and the local grocery store sale flier. I save time and money!

Weekly Meal Planner you ask? Check back tomorrow!